How to Create a Cutting List from Your Plans: A Step-by-Step Guide
Want to make your woodworking projects more efficient and precise? This step-by-step guide walks you through how to create a cutting list from your plans, ensuring you save time, reduce material waste, and improve accuracy. Learn how to break down your project into individual parts, optimize your cuts, account for saw kerf, and organize your cutting order for seamless execution. Whether you're a beginner or an experienced woodworker, these pro tips will help you build smarter. Read now and start cutting with confidence! 🛠️📐
3/14/20254 min read


How to Create a Cutting List from Your Plans: A Step-by-Step Guide
Build Smarter, Save Materials, and Work More Efficiently
Every great woodworking project starts with a solid plan—and a key part of that plan is an efficient cutting list. Whether you're building furniture, cabinetry, or a simple DIY project, having a well-organized cutting list can save you time, minimize material waste, and ensure precision.
If you've ever started a project only to realize you miscalculated a cut or ran out of wood too soon, you know how frustrating (and expensive!) it can be. A cutting list helps prevent mistakes, allowing you to work more efficiently and make the most of your materials.
In this guide, we’ll walk through the essential steps to develop an accurate cutting list that will set you up for success.
1. Understand Your Project Plans 📐
Before diving into the cutting list, you need to fully understand your project.
Key Considerations:
✔️ Dimensions – Know the exact length, width, and thickness of each piece.
✔️ Joinery Methods – Consider how pieces will connect (butt joints, dadoes, mortise and tenon, etc.).
✔️ Grain Direction – Some projects (especially fine furniture) require matching grain patterns for a professional look.
✔️ Material Type – Different woods require different considerations for cutting and assembly.
💡 Pro Tip: Sketch your project with labeled dimensions for every component before creating your cutting list.
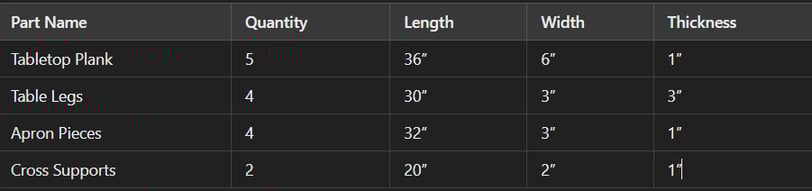
2. Break Down the Project Into Individual Parts 🏗️
Now, list out every individual component that needs to be cut.
Example Breakdown for a Simple Table:
By breaking everything into separate pieces with precise dimensions, you ensure accuracy before you even touch your saw.
💡 Pro Tip: Group pieces by thickness to maximize efficient cuts and minimize material waste.
3. Optimize Your Material Usage 🪵
Once you have a list of all parts, the next step is to lay them out efficiently on your wood stock.
How to Optimize Cuts:
✅ Use a full sheet layout (for plywood or large boards) to determine the best cutting order.
✅ Try to keep similar-sized cuts together to minimize wasted scraps.
✅ Factor in kerf width (the thickness of the saw blade) to ensure precise cuts.
💡 Pro Tip: Use woodworking software like SketchUp or CutList Optimizer to visualize cuts and reduce waste.
4. Account for Saw Kerf & Extra Material ✂️
A common mistake is forgetting about kerf width, the thickness of material lost when cutting with a saw blade.
Why It Matters:
Most table saw and circular saw blades remove 1/8 inch (3mm) of material per cut.
If not accounted for, your final pieces may be too small, leading to costly mistakes.
Always mark cut lines carefully and adjust for kerf loss when planning your cutting sequence.
💡 Pro Tip: If in doubt, cut slightly oversized and trim down for precision.
5. Organize Your Cutting Order 📋
Why Order Matters:
Cutting large pieces first ensures you don’t run out of material for critical parts.
Stack cuts logically to minimize repositioning and reduce time spent adjusting tools.
If a piece is cut incorrectly, you might still be able to use it for smaller parts.
Example Cutting Order for a Bookshelf:
1️⃣ Side Panels (largest pieces)
2️⃣ Top and Bottom Shelves
3️⃣ Back Panel
4️⃣ Shelving Pieces (smaller parts last)
💡 Pro Tip: Label each piece with chalk or painter’s tape as you cut to keep everything organized.
6. Double-Check Your List Before Cutting ✅
Before making a single cut, review your list one final time.
Checklist Before Cutting:
✔️ Have you measured twice and confirmed dimensions?
✔️ Is grain direction correct for visual appeal?
✔️ Have you planned the most efficient cuts to minimize waste?
✔️ Are you accounting for saw kerf?
💡 Pro Tip: Cut and test one piece at a time before committing to all cuts—this can save material if adjustments are needed.
7. Start Cutting and Stay Organized 🛠️
Once everything is planned, it’s time to start cutting!
Best Practices for a Smooth Cutting Process:
Cut with a sharp blade to ensure clean edges and reduce tear-out.
Use a stop block for repeated cuts to maintain consistency.
Stack and label pieces as you go to avoid mix-ups.
💡 Pro Tip: Keep your offcuts! They can be useful for small projects, test cuts, or reinforcing joints.
Final Thoughts: Why a Cutting List is Essential
A well-prepared cutting list can make or break a woodworking project. It helps you:
✅ Save time by planning cuts in advance.
✅ Reduce material waste by maximizing wood usage.
✅ Ensure accuracy by organizing all pieces properly.
✅ Work efficiently with a step-by-step approach.
By following these steps, you’ll cut smarter, waste less, and build better—turning your project from a rough sketch into a beautifully crafted piece.
Now, grab your plans, make your list, and start cutting with confidence! 🛠️✨
Have a tip for creating a cutting list? Share your experience in the comments below! ⬇️